|Creative Engineering
home page|
|Table of contents |
Learning HighRoad |
Using HighRoad|
Reference|
| Previous |
Next |
Chapter 13
Plan
This chapter shows you how to display the terrain model and the
plan view of the road on the screen.
The Plan window

In order to display the plan view of the road you must have
created a terrain model and designed a typical section and horizontal
alignment. Choose Plan from the Window menu. The terrain model will
be drawn on the screen.
Note: The screen could appear blank if the
current settings (i.e. Show Contours, Show Triangulation, Show
Features, Show Point info... , Show <Control line name>
details... ) have hidden the contours, triangulation etc. or if the
scale is such that nothing appears on screen. Choose Fit to Window
from the View menu and the outside edge of the project will be shown
on the screen.
You can choose what details of the terrain model that you wish to
show in the Plan window. You can show or hide the triangles,
contours, features and point information. Select the required items
from the Plan menu. You can also select what information HighRoad
will display about each control line in the Plan view. You can also
select the format of the display of numbers from the Preferences
dialog box. Choose Preferences from the Edit menu. The pop-up menus
allow you to specify the layout separately for each of the following:
chainages, co-ordinates, distances, elevations, volumes and contours.
Choose from the pop-up menus to set the format you require for
chainages, then co-ordinates and so on.
You can also choose to round the last digit to the nearest 5 mm
and to display leading zeros. Leading zeros will only be apparent
when there is a hundreds or thousands separator chosen. For example,
where a thousands marker such as a comma is active, the number 23.456
would appear as 0,023.456 if leading zeros are
chosen.
Displaying control lines
The active control line (the one on which you are working) has a
tick against it in the Active menu and all views of the road or pad
(i.e. Plan, Profile, Cross Section etc.) show information relating to
the active control line. The background of the current road is
displayed in yellow. The details displayed about each control line in
the Plan view will depend on what you have selected for that control
line.
Note: When you open a file that was created in
Version 3.5 of HighRoad, if it has a control line it will be named
Untitled and this name will appear in the Active menu. With a project
created in the current version, the name of each control line will
appear in the Active menu.
Figure
13-1
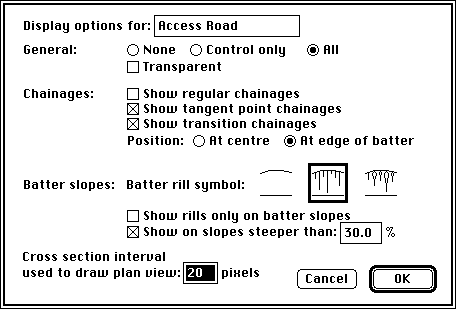
Select Show <Control line name> details... from the
Plan menu. A dialog box with the name of the control line, as shown
in Figure 13-1, will appear. You can choose
to show no details, control line only or the whole road or pad. The
transparent option and the batter rill symbols are only available
when All is selected. The transparent option is useful where you have
multiple control lines and you wish to see the details of their
intersection. For roads, transition chainages will not be shown
unless superelevation or plan transitions (see
Chapter 9) have been calculated.
Editing IPs
Use the scroll bars and different scales to examine various parts
of the plan. At any time after a horizontal IP is added, you can
adjust its position. Move the pointer to the IP you want to adjust
and it will change to a four pointed arrow ( ). Drag the arrow to the new location. HighRoad
will redraw the new view of the plan.
). Drag the arrow to the new location. HighRoad
will redraw the new view of the plan.
Note: For a building pad it has to be in polygon format to be
able to edit IPs. See
Shaping the
building pad
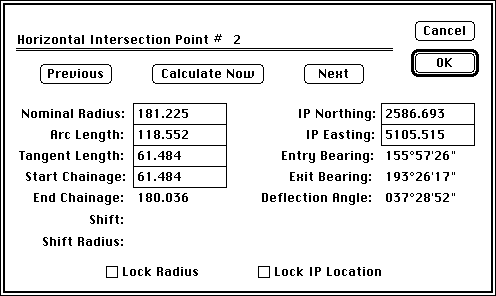
You can also precisely specify the location of the IP and the
details of the curve data. Double-click on the IP when the cursor is
a four pointed arrow ( ). A dialog box (as shown
in Figure 13-2) will appear on the screen.
Change the position of the IP or the elements of the curve. Click
Calculate Now. You can see the effect of your changes on the other
data. Click OK. The plan will be redrawn to your specifications.
). A dialog box (as shown
in Figure 13-2) will appear on the screen.
Change the position of the IP or the elements of the curve. Click
Calculate Now. You can see the effect of your changes on the other
data. Click OK. The plan will be redrawn to your specifications.
Figure 13-2
The information used to draw the plan is based on the current
horizontal alignment, typical section and profile data. Changes made
to any of these will also be reflected in the plan view when it is
redrawn. You can drag the control line off the edge of the terrain
model during adjustment of the horizontal alignment. On winding roads
where the strip of terrain is fairly narrow it could be inconvenient
to keep the control line within the terrain model at all times while
adjusting its position. As the alignment of the control line is
refined it should be moved within the terrain.
Note: It is necessary for the control line to be
within the terrain model when you display the profile or cross
sections, or any other window which depends on calculation of natural
surface along the control line or along a cross section. If you try
to open one of these windows while the control line is not entirely
within the terrain model a warning will be displayed and the window
will be closed.
Inserting or deleting IPs
You can also insert and delete horizontal IPs or add a new IP to
the end of the horizontal alignment. Insert IP... and Delete IP...
are available in the Plan menu when the Plan window is in front, and
two or more IPs have already been added. To insert an IP into an
alignment find the number of the IP (by double-clicking on it) after
which you wish to insert an extra IP. Choose Insert IP... and a
dialog box which asks for this number will appear. The extra IP will
be inserted half way between the IP you nominated and the next IP.
You can then drag it to its correct location, or relocate it by
double-clicking it and editing the values shown in the dialog box.
Note: If the IP is located so that the control
line is outside the perimeter of the terrain model, you will not be
able to display the profile or cross sections or calculate quantities
etc.
To delete an IP, choose Delete IP... The cursor will change to an
X shape. Position the cursor over the IP to be deleted and click. The
IP will be deleted. Choose New IP to add an extra IP to the end of
the horizontal alignment.
Redraw speed
Redrawing the plan view of the road after scrolling may take some
time on older computers. The speed of drawing is influenced by the
size of the chords which are drawn to represent curved lines. With
long chords, the speed of drawing is faster but the drawing appears
as a series of straights rather than as a smooth curve. You can
change the chord length by choosing Show <Control line
name> details... from the Plan menu. A dialog box will appear
as shown in Figure 13-1 previously. Type in
the required distance between cross sections in pixels. Selection of
a larger distance between cross sections (for example, 40 pixels)
will speed up the redraw considerably but may not be suitable for
detailed work or when printing.
You can also turn off items which are not needed for the current
task, for example, Hide Contours, Hide Triangulation, Hide Features.
This will improve redraw speed. To speed up the contour redraw,
choose a larger contour interval. If you turn off selected options on
different control lines you can also reduce the redraw time.
HighRoad allows you to choose whether plan redrawing will be
stopped when the mouse is clicked. Select Preferences... from the
Edit menu. Check the box labelled Stop plan redraw on mouse click.
This setting will be remembered by HighRoad. Once selected, plan
redraw is stopped when the mouse is clicked.
This is useful if you are zooming in on part of the plan. You may
need to zoom in several times to get to the scale that you want.
Instead of waiting for the plan to fully redraw each time, you can
wait just long enough to see sufficient detail to know where you are,
then choose Zoom again. As you click on the View menu the plan
drawing will stop, allowing you to select Zoom again. (This also
applies if you are using the Command ( ) key on Macintosh or the Alt (
 ) key on Windows to zoom.) Be aware that the plan
view may be incomplete if the mouse button is down at any time during
plan redraw.
) key on Windows to zoom.) Be aware that the plan
view may be incomplete if the mouse button is down at any time during
plan redraw.
Plan drawing does not stop under all conditions. The first time
contours are drawn they also have to calculated. This cannot be
interrupted. Subsequent redraws are much faster (providing sufficient
memory was available to store the contours) and can be interrupted by
a mouse click. You can also force an update of the plan view. If you
interrupt the drawing of the plan view, you may be left with a partly
completed plan. To force the Plan window to be redrawn, click on the
size box in the lower right corner. The Plan window will be redrawn
completely.
How the plan is
drawn

A line is drawn from the edge of each link in a cross section to
the corresponding point in the next cross section. In cases where the
same link does not exist in the next cross section, no line is drawn.
Consider the simple example in Figure 13-3.
The cross sections are superimposed over a plan plot of a straight
section of road. The typical section is made up of a link either side
of the centre line representing the pavement, a kerb and gutter edge
type, a footpath and a batter slope. This typical section applies for
the full length of the road.
Figure 13-3
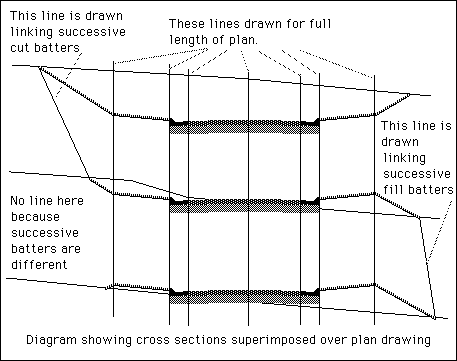
On the left hand side of the drawing, every cross section has a
point representing the centre line, a point where the pavement meets
the kerb and gutter, a point where the kerb and gutter meets the
footpath, and a point where the footpath meets the batter slope.
Lines representing these points are be drawn for the full length of
the road on the plan. The two cross sections at the top of the
drawing have a point where the cut batter meets the natural surface,
while the lower cross section has a point where the fill batter meets
the natural surface. Where adjacent cross sections have a cut batter
as in the top left hand side of the diagram, a line representing the
top of batter is drawn. Where adjacent cross sections have a fill
batter as in the lower right hand side of the drawing, a line
representing the toe of batter is drawn. At the cut/fill line, where
adjacent sections change from cut to fill batter or vice versa, no
line is drawn.
In the plan view, gaps will appear in the line representing the
top or toe of batter where the batters change from cut to fill or
from fill to cut. The size of the gaps will depend on the size of the
segment length chosen. Gaps will also appear if other links are not
continuous along the length of the road.
| Previous |
Next |