|Creative Engineering
home page|
|Table of contents |
Learning HighRoad |
Using HighRoad|
Reference|
| Previous |
Next |
Chapter 12
Intersections
This chapter shows you how to create intersections on a main road.
The design details for an intersection are handled automatically by
HighRoad. However you can control these details manually if you wish.
Note: This option is available only if you have
the Intersection module. This module is included in HighRoad Plus and
HighRoad Pro and is optional in other models.
Preparing for
an intersection

In order to create an intersection you must first design the main
or through road of the intersection. This should be done completely,
even if just in a trial form. It should have a horizontal alignment,
a profile, and a typical section. The intersection will be
automatically attached on the side of this road at the position that
you nominate. This road should be active when you are ready to create
the intersection. Choose the road from the Active menu.
Creating an
intersection

Choose Place intersection on <Road name>... from the Plan
menu. The cursor will change to an intersection shape ( ). Click beside the through road at the location
that you want to place the intersection. HighRoad will, using default
dimensions, create the side road and kerb returns to produce an
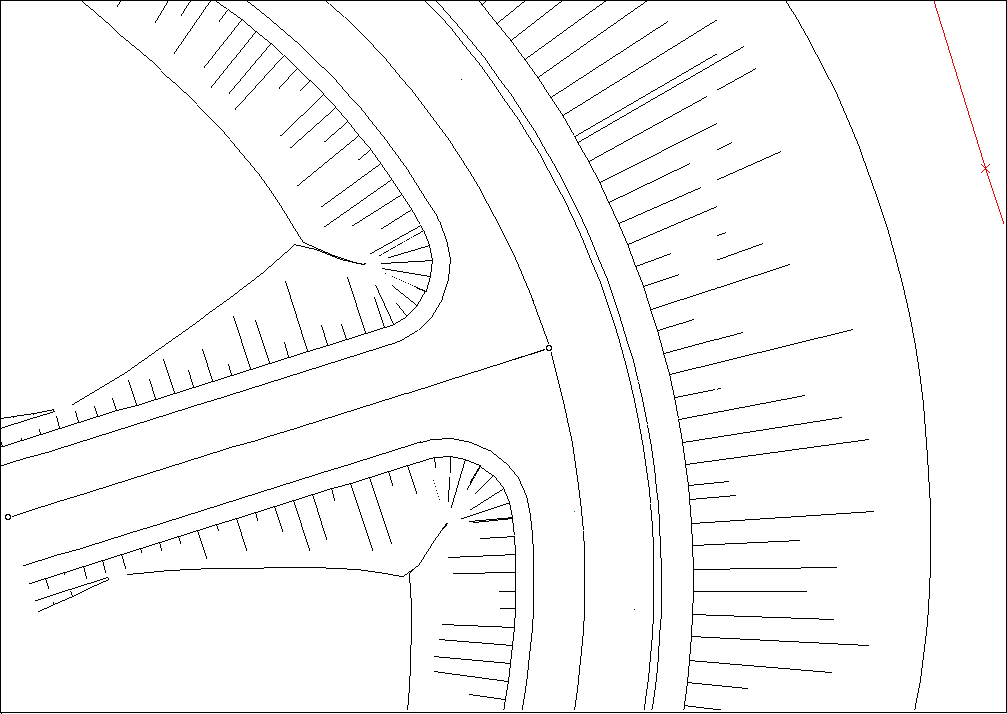
intersection at this location, as shown in
Figure 12-1. When the cursor is over the
intersection it becomes a hand shape and you can drag the
intersection. You can also double-click to show the intersection
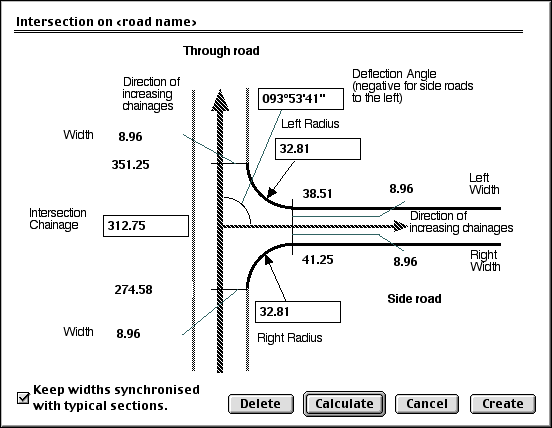
details. A dialog box as shown in Figure
12-2 will appear. This shows in a diagrammatic form a typical
T-intersection together with critical chainages along both control
lines. You can alter the details of the intersection that HighRoad
has created. As you change these values, and click Calculate, or move
to another field, all the related details of the intersection will be
recalculated.
). Click beside the through road at the location
that you want to place the intersection. HighRoad will, using default
dimensions, create the side road and kerb returns to produce an
intersection at this location, as shown in
Figure 12-1. When the cursor is over the
intersection it becomes a hand shape and you can drag the
intersection. You can also double-click to show the intersection
details. A dialog box as shown in Figure
12-2 will appear. This shows in a diagrammatic form a typical
T-intersection together with critical chainages along both control
lines. You can alter the details of the intersection that HighRoad
has created. As you change these values, and click Calculate, or move
to another field, all the related details of the intersection will be
recalculated.
Figure 12-1
Location
The location at which the side road will be attached to the road
is shown as Intersection Chainage. This location is initially set
where you clicked along the main road. You can change this as
appropriate for your design.
Note: Be sure to leave sufficient room for an
intersectuin where you click. It is advisable to click well away from
the start or end of the road when placing an intersection. The
intersection can be dragged closer to the end later if necessary.
Kerb returns
Kerb returns (or pavement returns as the case may be) allow for a
smooth connection between the main road and the side road. HighRoad
initially sets the radius of each kerb return to 7.5 metres. You can
change this radius to one that is appropriate for your design. The
left and right kerb returns are viewed as if you are standing at the
start of the side road and looking along the side road. An arrow and
the labels left and right are shown in the Intersection calculator in
Figure 12-2.
Note: The diagram in Figure
12-2 does not change to show a side road going to the
left. You need to be aware of this when specifying the kerb return
radii for roads going to the left.
Figure
12-2
Changes in the radius of a kerb return will effect the tangent
point chainage at which it matches the main road and the tangent
point chainage where it matches the side road.
Pavement widths
The initial values for width are taken from the half section of
the main road where the intersection is attached. The width of the
first link of the main road typical section is applied to the first
left and right links of the side road typical section. The box marked
Keep widths synchronised with typical sections is checked. This is
the default setting and is appropriate when the first link left and
right of the control line is the pavement width. This may not be the
case for your design. For example the pavement may be made up of a
number of links. The appropriate value for the width is the sum of
these. If you want to control the widths yourself uncheck the box
marked Keep widths synchronised with typical sections. The pavement
width at the start and end of each kerb return is used to calculate
the location of the kerb return arc.
Note: If the box is not checked HighRoad will not
automatically adjust the widths if you change any of the typical
section details that affect the intersection.
Deflection angle
The default value of the deflection angle of the start of the side
road control line is ±90° 00' 00".
This places the intersection on the same side of the through road
that you clicked and at an angle of 90°. You can change this as
needed. This deflection angle is positive for side roads to the right
of the through road (as shown in the Intersection calculator in
Figure 12-2) and negative for side roads to
the left.
Note: The diagram in Figure
12-2 does not change to show a side road going to the
left. You need to be aware of this when specifying the deflection
angle for roads going to the left.
The elements of the intersection include three new control lines
(representing the side road and two kerb returns) with a horizontal
alignment, typical section and a profile for each control line. The
length of the side road is initially 50 metres.
Adjusting the intersection
Either the side road control line or one of the kerb returns
should be active when you want to adjust the intersection. When the
cursor is over the intersection it changes to a hand shape.
Double-click the intersection to adjust its dimensions. A dialog box
as shown in Figure 12-2 will appear. You
can now edit the details of the intersection. You can also drag the
intersection along the main control line. The deflection angle can be
adjusted graphically by dragging the second IP of the side road.
Side road

Horizontal alignment
The horizontal alignment of the side road is initially created
with two IPs. The first is at the start of the side road on the
centre line of the through road. The second horizontal IP is located
50 metres away at an angle of 90°. If you drag this second IP of
a road, the deflection angle and the distance to this IP will change.
HighRoad will use the new chainage and the deflection angle to the
first IP of the side road whenever the intersection is subsequently
moved along the through road. You can add more IPs to the side road
just as you would for any road by choosing New IP from the Plan menu.
Be sure that the side road is the active control line when you do
this.
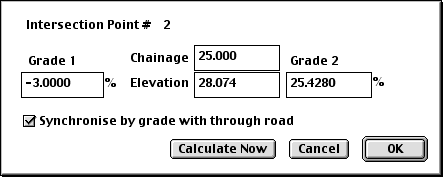
Profile
When an intersection is created, a profile is provided for the
side road. Three vertical IPs are created. The first two of these are
synchronised as outlined below. A circle appears around the IP to
show that it is synchronised. The first IP is synchronised to the
Intersection Chainage. The second is synchronised by a grade that
matches the crossfall of the through road.
Figure 12-3 shows a profile for a side
road. The elevation for the start of the side
road is taken from the levels of the through road. The start of the
side road is connected to the centre line of the through road.
Figure
12-3

The side road is initially given a length of 50 metres. The second
vertical IP is placed at 25 metres, and the third vertical IP at 50
metres. The second vertical IP is given an elevation based on the
grade from the start of the road. The start grade of the side road is
matched to the crossfall of the through road. The through road
typical section at the chainage of the side road is scanned to find
the crossfall of the pavement link to which the side road attaches.
This grade is used to calculate the grade to the second vertical IP
in the side road. The vertical curve length is calculated to be long
enough to just touch the edge of the pavement of the through road.
The third VIP is placed at ground level.
Note: For side roads not at 90 degrees, this
grade will not be correct. You will need to do some calculations to
establish an appropriate grade and then adjust the elevation of the
second vertical IP until you get the required grade.
You can choose to disconnect HighRoad's automatic synchronisation
of the vertical IPs. Double click the second vertical IP. A dialog
box as shown in Figure 12-4 will appear.
Uncheck the box marked Synchronise by grade with through road.
Similarly you can disconnect the synchronisation of the first IP. It
will show a similar check box but it will be labelled Synchronise
with through road.
Figure
12-4
Updating the side road profile
When an intersection is moved along the through road, or the
grading of the through road is changed, the profile of the side road
will be adjusted if you have not switched the synchronisation off.
The start elevation of the side road will be changed to match the new
level of the through road. The grade at the start of the side road
will be changed to match any change in the cross fall of the through
road. The elevation of the second vertical IP will be adjusted so
that the grade is correct. Its chainage or vertical curve length will
not be adjusted. HighRoad assumes that while you want the side road
to still connect correctly to the through road, you may have changed
both the chainage of the second VIP and the vertical curve length to
suit your design requirements. The third vertical IP will not be
changed in any way. Its incoming grade may change as a result of the
change in elevation of the second IP.
Typical section
The typical section of the side road is created by adapting the
typical section of the through road. Consider the example of the
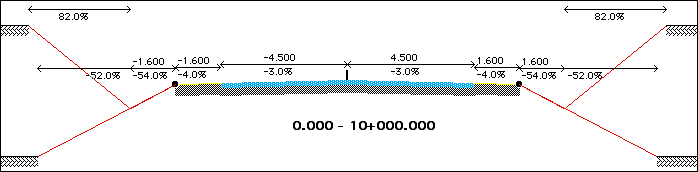
through road typical section shown in Figure
12-5.
Figure
12-5
The typical section of this road is purposely asymmetrical to make
it easy to describe this process. The left side has a kerb and a
footpath, such as in an urban road. The right side has a shoulder and
a drainage ditch, as in a rural road. The intersection is attached to
the right hand side of the through road.
The right side (the rural half of the through road typical
section) is used to create the typical section for the side road.
This half section is used directly to create the typical section for
the right half of the side road, and reflected to create the left
half of the side road. The resulting typical section is shown in
Figure 12-6.
Figure
12-6
Kerb return

Horizontal alignment
When an intersection is created or adjusted the kerb return
geometry is calculated to fit the kerb return arc between the tangent
points. Figure 12-7 shows the through road
and side road before the addition of kerb returns.
Figure 12-7
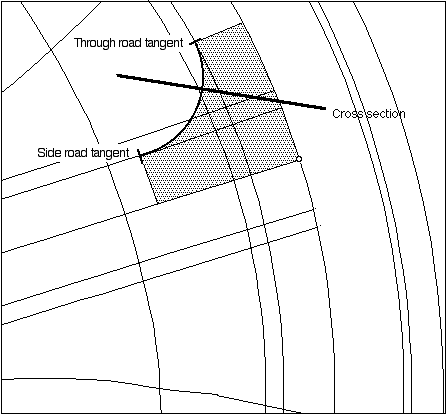
Superimposed on this is a diagram of the right kerb return. (The
chainages of the through road are increasing down the page. The side
road is attached to the right side of the road.) The shaded area in
Figure 12-7 is the area of pavement that is
part of the right kerb return. The control line for a kerb return
follows the line of the arc shown in Figure
12-7. It starts at the through road tangent and finishes at the
side road tangent. In many respects a kerb return control line is
just like any other control line.
Typical Sections
Like the side road, the typical section for a kerb return is
adapted from the typical section of the through road. Consider the
shaded pavement area shown in Figure 12-7.
At the start of the kerb return (the through road tangent point) the
pavement width and slope matches the pavement link on the right side
of the through road typical section.
Figure 12-8
Figure 12-8 shows the pavement link for
the through road. The control line for the kerb return follows the
arc shown in Figure 12-7. The matching
pavement link which is attached to the left of this control line is
shown in Figure 12-9.
Figure
12-9
The signs (positive and negative) of the offset and crossfall of
this link are opposite to the typical section of the through road as
shown in Figure 12-8. This is because they
are on the opposite side of the control line.
There are some special requirements for a kerb return typical
section. The offset and crossfall will vary at different locations
around the kerb return. Consider the cross section shown in
Figure 12-7. This is a cross section on the
kerb return control line. The pavement at this section is required to
join to the centreline of the through road. To attach to the control
line of the through road an anchor feature is created as part of the
intersection. This anchor feature is invisible and is created and
moved automatically as necessary when the intersection is moved or
adjusted. See
Attaching a
pavement to a feature, in Chapter 7,
Typical sections for details.
Note: Be very careful if you edit anchored links
that are created automatically. These links and the matching feature
are changed automatically when the cul-de-sac is moved or some aspect
of the design is varied. If you alter such a link or its matching
feature, HighRoad may not be able to correctly make adjustments
later, and you may get unexpected results.
To complete the typical section of the right kerb return, the
shoulder, drainage ditch and batter slope must be added to the right
side of the kerb return control line as shown in
Figure 12-10.
Figure 12-10
Profile
When a kerb return is first created by HighRoad it has four
vertical IPs. Each of these are synchronised as outlined below. A
circle appears around the IP to show that it is synchronised. The
chainage, elevation and grade at the start of the kerb return are
calculated to match the through road at the edge of the pavement. The
chainage, elevation and grading at the end of the kerb return are
calculated to match the side road at the edge of the pavement.
Figure
12-11
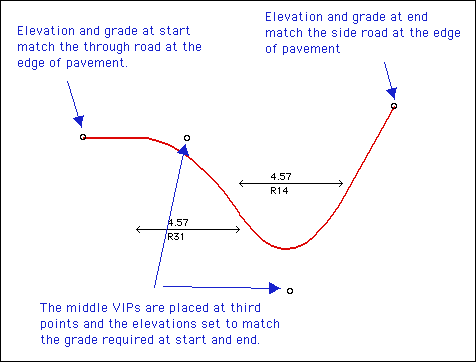
The middle vertical IPs are located at third points. The
elevations of these vertical IPs are set to match the grade required
at the start and the end of the kerb return. See
Figure 12-11. The second Vertical IP is
controlled by grade to the first IP. If you drag its position, it
will remain at the chainage that you specify, but its elevation will
be adjusted so that the slope is always correct. Similarly the third
vertical IP is controlled by the grade to the fourth IP.
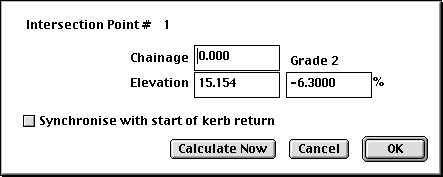
There will be occasions when you want to take control of the
grading. You can choose to disconnect HighRoad's automatic
synchronisation of the vertical IPs. Double click the second vertical
IP. A dialog box as shown in Figure 12-12
will appear. Uncheck the box marked Synchronise with start of kerb
return. Similarly you can disconnect the synchronisation of the three
other IPs. The second IP will show a similar check box but it will be
labelled Synchronised by grade with start of kerb return. The last
two IPs have similar check boxes.
Figure
12-12
Updating the kerb return profile
Whenever the grading of the through road or the side road is
adjusted, the grading of the kerb returns are also adjusted to suit.
The grading of the kerb returns in response to an update is similar
to the original creation of the kerb return. The vertical IPS that
are updated are those that are marked as synchronised. (Initially all
the VIPS of the kerb return are synchronised as this is the default
setting.) You can insert extra vertical IPs in between the first two
and last two in cases where extra IPs are needed to correctly grade
the kerb return. These IPs will not be synchronised and will not be
adjusted automatically when other changes are made.
Interaction
of variables

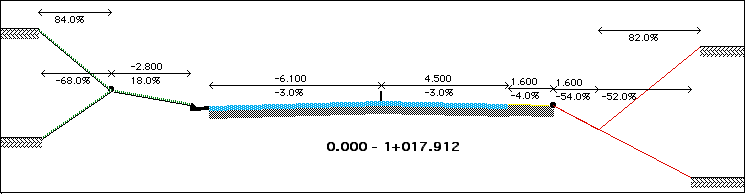
Figure 12-13 shows a simple case of an
intersection on a straight road and with a straight side road. The
location of the tangent points of the kerb return in relation to the
main road and the side road are calculated to suit the following
variables:
* width at tangent point on main road
* width at tangent point on side road
* radius of kerb return.
A change in any of these variables will trigger a recalculation of
the intersection details. For example, with the kerb return shown, a
change in the width on the main road would change the tangent
chainage on the side road by an equal amount. This in turn will
effect the vertical grading of the side road and the kerb return. The
elevation and grade of the kerb return tangent point on the side road
will now be different, and will result in a new kerb return grading
being calculated.
Figure
12-13


If the side road was changed to an angle other than 90°, the
tangent point chainage on the main road as well as the side road
would change. This would result in a recalculation of the side road
grading and the kerb return grading.
Note: HighRoad will not make any adjustments
to the vertical grading if you have switched off the automatic
synchronisation features.
Intersecting
batters

The batter slopes of the side road and main road can interact in
the vicinity of the intersection as shown in
Figure 12-1. The interaction between the
batter slopes can be complex. The calculation of the batter
interaction line is done as an iterative
process. Ultimately an anchor feature is created to which the batter
slopes can attach. For further information on anchored links see
Attaching a
pavement to a feature, in Chapter 7,
Typical sections. The anchor feature is invisible and is
created and moved automatically as necessary when the intersecting
roads are moved or adjusted.
Note: The anchor feature can be complicated. Take
the case of a main road with multiple side roads to the left. The
left batter of the main road would attach to multiple anchor
features. The pop-up menu of the link editor allows attachment to
only one anchor feature. This problem is overcome by having a
sequence of anchor features. The first in the sequence is referenced
by the pop-up menu in the link editor. All features in the sequence
are checked, even though only the first appears to be referenced by
the link editor. This is done automatically by HighRoad.
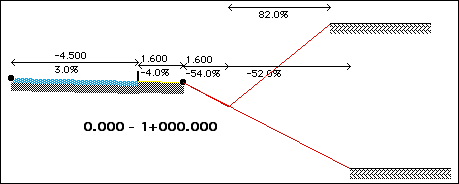
To draw the plan of the kerb return, cross sections are calculated
close together (at the interval you have specified). These cross
sections would normally overlap at the centre point of the kerb
return radius. Part of Figure 12-1 relating
to the right kerb return is shown in Figure
12-14.
Figure 12-14
It highlights the batter slopes which are part of the right kerb
return. In this example the batter slopes are in fill and the slope
for the through road and the side road in this area is 52%. At this
slope the batters extend further than the centre point of the kerb
return radius. For the arc of the kerb return, all batter slopes
extend to the same point which is the kerb return centrepoint. The
elevation of this point, calculated from the through road is quite
likely different to the elevation calculated from the side road. For
fills, HighRoad uses the highest of these as the fixed level to which
all the batter slopes of the kerb return extend to. For cuts, the
lowest of these is taken as the fixed level to which all kerb batters
are attached.
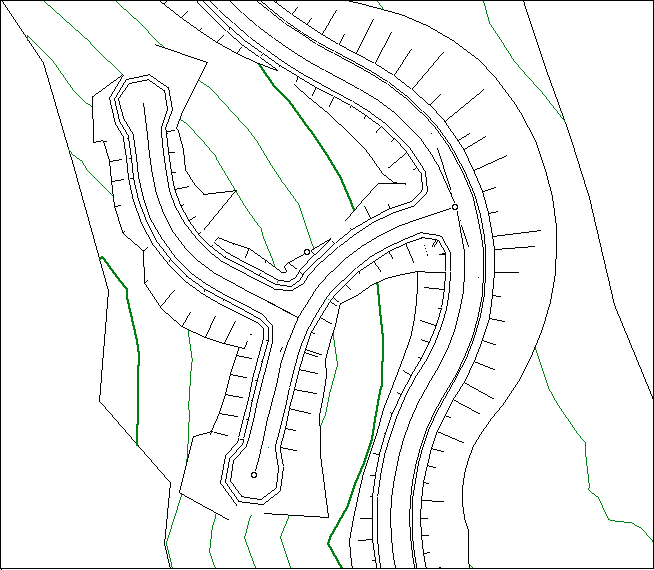
Interrelated
intersections

In the small road network shown in Figure
12-15, there is a series of related roads, intersections and
cul-de-sacs. The interrelationship between these roads makes for a
complex updating procedure when any road is moved. A change in the
grading of the through road may effect the grading of the side road,
which may in turn effect the grading of its side road. Such inherited
effects are automatically handled if you have not switched off the
automatic synchronisation features that HighRoad provides.
Figure
12-15
| Previous |
Next |